Do you enjoy making teacher resources? Are you looking for ways to make the process faster? I am all about saving time and being efficient! In this post I will show you keyboard shortcuts that you can use on almost any program.
Specifically, I will go through 6 keyboard shortcuts that I literally use on a daily basis. Using these keyboard shortcuts will save you a TON of time!
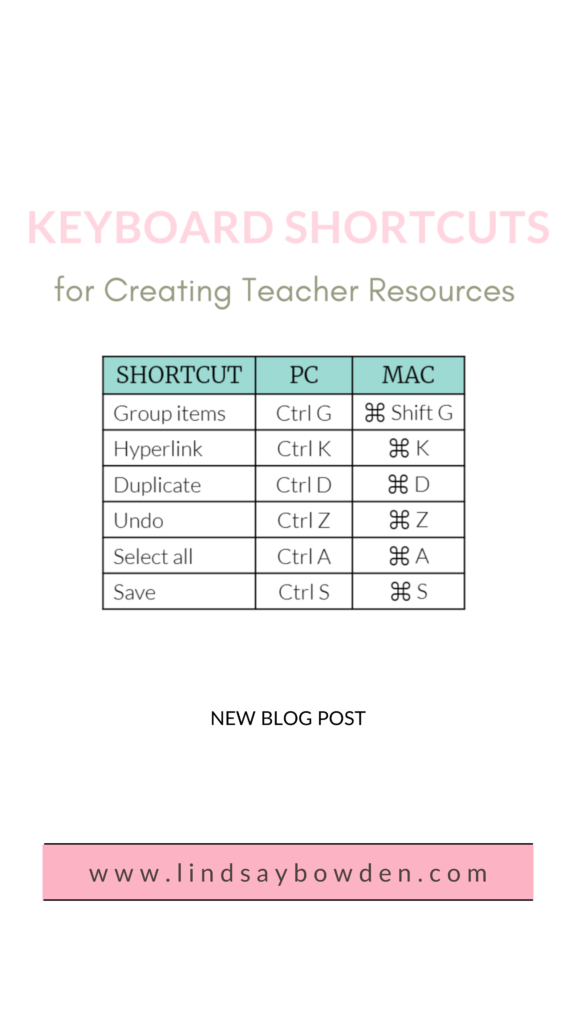
Shortcut #1: Grouping Tool
The grouping tool allows for you to move multiple pieces or parts all at once instead of moving them one by one.
The first step is to select all of the pieces. You can click and drag your move over all of the pieces. This will select all of the pieces you want to move.
Next, you will group the objects together. You can use the keyboard shortcuts listed above OR you can right click and then select “Group”.
Now all of the pieces will move as one big piece.
If you want to move individual pieces you can right click and select “Ungroup”. This will allow for you to move the pieces individually again.
Pro-Tip: This is perfect for geometry resources since you have a lot of pieces that go along with visual aids!
Shortcut #2: Hyperlink Shortcut
You can hyperlink text or a shape to a specific website. First, select the text or the object you want to hyperlink.
Next, use the keyboard shortcuts from above, type the website address into the address bar, and select “OK”.
The process is the same no matter what you are using as a hyperlink (ie: text or shapes).
In order to use the hyperlinks, your PowerPoint presentation must be in either presentation mode OR you can save your PowerPoint as a PDF. In either way when you click the shape or text it will take you to that website address.
Shortcut #3: Duplicate Tool
Using the duplicate tool is actually the same thing as “copy” and “paste”, but it is even faster since it is one command instead of two separate ones.
In order to duplicate your object or text boxes use the command listed above. You can make a bunch of duplicate objects in a very short amount of time!
If you are trying to move your objects to different slides (such as on PowerPoint) you do have to still use the copy and paste function.
Shortcut #4: Undo
This is probably one of my all time favorite shortcuts because I probably use this one the most!
We all make mistakes so if you make a mistake on your resources you can “undo” it by typing the keyboard shortcuts above.
Shortcut #5: Select All
“Select All” will select everything on the current slide (for PPT). First, click within the slide. Next, use the keyboard shortcuts from above to select all of it at once.
If you are trying to select more than one slide click on the outside border of the page thumbnails. Then, use the keyboard shortcuts to select all of the slides at once!
Shortcut #6: Save Tool
Even though PowerPoint and many other programs have an automatic saving feature for your work, it is still smart to save your work as you go!
In order to save the progress you are making on your resource, use the keyboard shortcuts from above. When you use the shortcuts you will see “SAVED” pop up by the name of the resource.
I hope these tips were helpful! Using these 6 tips has not only saved me time, but it also saved my sanity. It has made the process of creating resources so much more streamlined. Do you love using keyboard shortcuts too?! Comment below or tag me on Instagram and let me know!
Want to learn more about the process of creating resources?! Head to LindsayBowden.com/Training to sign up for my free training on creating engaging teacher resources!
You may also like: